Showing posts with label projects. Show all posts

Friday, June 7, 2019

The Final Countdown

Cue Europe's only hit song...Now! 

Image result for the final countdown

We're in the final stretch for the school year... Seniors are done in a week, and the rest are done in two, with a field day for the last day of school on the 24th.  Whew!

I have also finished my work on this quarter's 20 Time project.  Although... I don't think I'm all that finished, actually.  More on that later.


I spread out all of my hats on my desk this morning for a final photo.  You are looking at 78 hats for preemies in various shapes, sizes, and patterns.  I'm in love with the little aviator hats, and the newsboy caps, as well.  Last night, after Ella went to bed, I sewed on decorations--buttons, flowers, pom-poms.  I had to make the pom-poms first, of course.  I have some very small pom-pom makers I bought many years ago, and struggled with making them work.  But I figured it out this time, and LOVE those tiny little balls of yarn!  So I put them on a bunch of hats. 

I had originally set myself a goal of 50 hats, and the last time I had counted them, I was pretty close.  But then I found some new patterns that I just HAD to try... and I started cranking out hats lickety-split, completing 12 or so a weekend.  I had memorized the patterns, and went to town, so to speak.  I learned to do colorwork--little striped hats--without having to weave in a gazillion tails.  And I experimented with sizes.  I found a pattern for a little newsboy cap, but I felt it was missing something--that little band that goes across the front.  So I did some trial and error on making the band, and came up with a reasonable and easy solution. 

I'm pleased with my results, and have enjoyed making these little gems.  They are a form of instant gratification for me.  In the past, I've always been able to make things for my mother, who loved being the recipient of my skills.  But since she passed, I've lost that... my daughter isn't as interested in things I can make her, and it's hard to find things to make for my husband.  So this filled a void in my life, and made me happy. 

I am not really going to stop making hats (well, I will temporarily).  I have plans for holiday hats for fall and winter, and I know that hospitals can use them.  I've pinned all kinds of cute hats on Pinterest for me to make.  Oh, the possibilities!  I want to do other preemie items, as well.  So, I can see this as an ongoing project for me. 

Here are the close-ups: 


I will deliver these to Tacoma General tomorrow.  I hope they like them!  

Tuesday, May 28, 2019

The Button Box

One of the projects my Seniors are currently working on is autobiographical writing.  I promised them I'd be doing the project along with them, as I wouldn't have them do something I myself wouldn't do, so... I just finished a piece of writing I'd like to share.  Since I don't have a teacher to submit my efforts to, I'm putting it on the Interwebz for others to see.  And since I have this blog linked to my teacher website, students can access it and read, if they like. 

It is longer than I expected, a little over two pages, typed.  But... here it goes.  I've titled it "The Button Box."


I am a bit of a hoarder.  Not in the “OhmyGod your house should be condemned!” sort of way, but I definitely hold on to stuff.  I save cards people have given me, my daughter’s art, writing, and grade sheets, pictures not in frames, shoes I just can’t give up yet, pens, books, etc.  If it has value and meaning to me, I’m holding on to it.  I can’t help it… and I’ve been doing it since I was a kid.

This weekend, I was cleaning and reorganizing my sewing room.  For the last three years, my niece was living in it, and most of my stuff was completely inaccessible.  The only things I really had any access to were my beads and paper crafts.  And yarn.  That is mostly because these were things I stored in places other than her room.  My niece moved out in March, so my old sewing room is free again.  Whee!!! 

We’ve cleaned it, fumigated it (teenagers…ugh!!), and now I’m in the process of rearranging, organizing, and transferring my scattered supplies back into the room.  I am also integrating the massive inheritance my mother left me:  all of her sewing room.

Mom’s sewing room was huge.  I don’t know the actual dimensions, but it was about half the size of my classroom, which is pretty generous.  One long wall was lined with metal and plywood shelves used in garages to store Big Stuff, like holiday decorations, tools, manly stuff.  Mom’s were filled with large plastic bins with lids that fold together with linked flaps, kind of like when you fold your hands.  There were three of these bins per shelf, and four shelves per rack.  Five of these racks lined one wall, and a sixth one occupied another wall, along with two large white melamine cabinets packed with fabric.  Most of these bins contained fabric, although a few contained trims and laces.  Some contained dolls and doll furniture, accessories, etc. 

She had two large bookcases full of books, magazines, and countless binders of patterns, ideas, magazine articles, paper dolls, craft instructions, sewing tips, etc.  Another large bookcase, on top of a 6’ table, was stacked with cards and cards of lace, trims, and ribbons.  She had multiple plastic storage carts with drawers filled with small silk flowers, vintage flowers, tiny doll accessories, buttons, ribbons, more trims, feathers, small dolls, you name it. 

It took me multiple trips over the course of a year to go through it and decide what to keep and what to donate or toss.  The local library received multiple stacks of books on various crafts and hobbies.  Local churches who make quilts for hospitals and charities received so many boxes of fabric, I’m sure they struggled with where to store them!  And what a heyday for those ladies as they went through all those fabrics!  I know mom would have enjoyed seeing their excitement as they opened and went through all the treasures within those boxes.

So rebuilding my sewing room has its pleasures, as well.  And much sadness, as bringing my mother’s things into my home means that she is really gone.  It reminds me of better, happier days, when mom and I would work on sewing doll dresses for some event, listening and singing to show tunes (Andrew Lloyd Webber being a favorite), talking about some subject (favorite topics included history, celebrities, books we were reading, and family stuff), listening to talk radio and chatting about issues, all while our nimble fingers created pretty little things for collectors.  We’d go out for lunch if it was summertime or the weekend (when we teachers have some free time), combining lunch with an opportunity to go to the fabric or craft store. 

As I was moving little storage boxes of buttons and beads to a temporary spot on a shelf, I lifted a small metal lunchbox-style case that was rather heavy.  I’d forgotten what I’d put in there, and gave it a shake.  The resulting soft rattle told me it was full of buttons.  The rattle was a familiar one, a reassuring sound. 

It’s amazing how much certain sounds can bring back memories.  Whenever I hear “Funky Town” or anything from Billy Joel’s “Glass Houses”, I’m instantly transported to the basement of our old house, sitting on a tall wooden stool, listening to music and chatting with my dad while he made stained glass panels.  The sound of a hatchet thumping through a chunk of wood to chop kindling brings the smell of pine and canvas to mind, of camping in my childhood.  The gurgle of coffee brewing in a pot is a homey sound to me, recalling the times we spent with my grandmother in her mobile home in San Diego, waiting impatiently for our turn to be served our own slice of her special French Toast, a rich, crispy, old-fashioned battered bread fried in a sizzling iron skillet.

I didn’t think much about the sound of the buttons in their round, lunchbox-type tin.  But after I turned off the light that night and settled in to sleep, my brain began wandering, as it usually does.  That heavy box of buttons brought to mind my mother’s button box, and wondering where it is now.  Sometime last year, not long after mom died, my dad called me to ask me where it would be in the sewing room.  I suggested it was in one of those large plastic bins on top of a rack nearest the end of the wall, where mom kept old sewing supplies and such.  He called me back to say he’d found it.  I don’t remember why it was important to him.  And I don’t know what he has done with it since then.

Thinking about that button box brought back sensory images of struggling to pop the lid off the button tin, and how I used to love to dig my hands into the shallow sea of buttons inside, the feel of cool plastic, metal, glass and shell slipping over my fingers.  The box was a round, old-fashioned metal tin, about the size of a dinner plate.  It had a sort of nubbly texture, a slightly rough crazed metal lacquer peculiar to tins made in the early 20th century, darkened by use over time.  It probably was originally designed for cookies or biscuits.  The buttons inside represented a wide variety of fastenings, with plain, dull brown and black buttons, glass fancy-cut ones, tiny shoe buttons, creamy white mother-of-pearl shirt buttons, and all of them in various sizes, some larger than an inch.  There were buttons held together on long safety pins, buttons of woven leather strips, black buttons with metal shanks, metal buttons with nautical or militaristic emblems on them, and even buckles of various sizes and materials, all comingled with a detritus of chipped-off bits, dust, shreds of thread, and a few straight pins that sometimes poked your fingers if you weren’t careful as you rummaged through the box.

How we used to play with those buttons!  On a rainy day, they were “coins” while playing dress-up, loading up old velvet bags to go “shopping” in the basement.  They were employed as game pieces when we were missing a checker or pawn.  Sometimes I’d use them as plates and dishes for my dolls.  I would take them out and organize them just to see how many of each kind were in there, and then get bored because there were so many.  My brother and sister and I each played with them.  When my sister grew up, her kids played with the buttons, too.  I’ve heard them talk about Grandma’s button box fondly, which always made me smile, remembering the same pleasures as a child. 
Over time, the number of buttons in the box diminished.  I’m sure each kid who played with them ferreted away their favorites for various uses, perhaps because it was a special or pretty one.  Maybe it felt good to rub a thumb over its smoothness or unusual texture.  Perhaps they got used for a craft project, or to fix a garment or two.  Or maybe the buttons reminded them of mom/grandma and good times. 

My button box is considerably smaller, about the size of a dessert plate, and the buttons in it aren’t so old and cool as mom’s, mostly leftovers from various projects, with a handful of extra buttons that come with shirts sometimes, but I like to think that it’s carrying on that legacy.  Ella hasn’t wanted to explore it, but… I haven’t had a sewing room for three years, and she probably doesn’t even know it exists.  Once I get the room in working order, though, she’ll be in there plenty of times.  She, too, likes to make things, and to spend time with me while doing that.  We like to listen to music or audiobooks while we work, and to chat, of course.  She wants me to teach her how to do various crafts, and I’m looking forward to sharing with her the things my mother taught me, and the Zen-like pleasure that comes from making something with your hands. 

And, at some point in time, she may need a button.

Memorial Day Weekend update

Good morning! 

On Friday, I listed multiple things I wanted to do this weekend, and I thought this morning that I would tell you how things went.

I don't have any pictures, but I cranked out another dozen hats this weekend!  It was nice to simply rest and let my fingers do the work.  Plus I had inspiration from the new patterns.  And I did some color work--I don't like weaving in ends, so I try to avoid making color changes when I knit or crochet.  But, I took the plunge this weekend, and found that alternating rows of color (for a striped effect) wasn't as annoying/frustrating than I expected it to be, and the hats I made are really cute!  I'll take pictures later and post them, along with pattern links.

Saturday I ended up sleeping in rather late--guess my body needed it!  Although I was sleepy through much of the day, so... not sure about that.  I had a hair appointment at 1:30--trim and roots--and then got a pedicure afterwards.  Because it was raining, there were very few people in the salon, so I didn't have a long wait.  I even indulged in a "mud mask" kind of thing on my legs and feet.  My feet are very soft and have no callouses now!  And my toes are pretty again.  After I got home, my husband had test-driven a car home (long test drive) because he really liked it and thought I would.  At first, I was a bit hesitant, as the car seemed to be larger than what I am used to (and I really don't like driving big vehicles), but it was actually really nice, and easy to navigate.  Roomy on the inside, comfortable, and it's a hybrid, so the gas mileage for my 25-minute commute (each way!) would be far better than the gas-guzzler I'm driving right now. 

Background:  We had three vehicles, with the intention that the third vehicle (a Nissan truck) would be for my niece's use.  My niece never got her license while she lived with us, so now that she's in Idaho with my dad, we don't need a third vehicle.  The first week in April, we took my Outback in to the dealership to fix an airbag recall thing, and they didn't finish by the end of the day, so they gave us a loaner Outback--2019 model.  Mine is a 2012, still a nice car and decent gas mileage, but... this loaner car was Amazing!  All the new features and upgrades were really eye-opening for us, so we started thinking about upgrading the Subaru.  My husband decided, however, that if we're going to get a new car, how about checking out other cars in the same type?  Thus, the Great Car Hunt began.  He kept updating me on all these statistics and models, which was overwhelming my already overloaded brain.  So I told him to narrow it down to three or so vehicles, and then we can talk.  I test-drove several vehicles (thus far):  A Mazda 5 with Turbo, a Mazda 6 (I think it was a hybrid), a Toyota Rav-4 hybrid, and this weekend, a Toyota Highlander hybrid.  The last one is the one I drove Saturday.  We decided we liked it, and started the process of buying it (we're waiting on the house refinancing to be completed before we buy).  Now, of course, my husband is second-guessing himself... the car is last year's model, and used, which has its own benefits, but he always does this. 

Anyway... Sunday, after a tasty waffles and sausage breakfast, I worked in my sewing room, moving my laces to a different bookcase, and putting my books in the other bookcase (This bookcase will be full soon...I have a TON of books and pattern binders).  I also condensed some things, went through boxes and rearranged how I store some things, etc.  Then my husband asked if I was ready for him to bring things up.  This is the biggest part of the job... I inherited my mom's sewing room, which was vast and jam-packed with all kinds of stuff.  I spent much of last year going through it all, making donations to local charities (lots of quilting fabrics) and libraries.  But now that it is reduced in size, it's in my garage, taking up a lot of space.  So... now that I've made room and plans, it was time to start moving stuff to my sewing room. 

First, a small chest of drawers.  It's very small, but it has been in my mother's various sewing rooms for my entire life.  It came from my grandmother's house, and I used to think it was ugly.  It could do with some surface cleaning (Mr. Clean sponges to the rescue!), but the yellow and white doesn't bother me now.  It has tradition with it...and I couldn't say goodbye to it.  The top drawer contains sewing accessories, needles, machine needles, etc.  I forget what's in the lower two drawers.  One used to be packed with spools of thread, but those have been transferred to several plastic bins.  In the picture, the bins on top of the little chest are all full of thread (except the long, flat box). 


Next came two racks of small storage containers.  My dad custom-made these racks for my mother to store all of her buttons, doo-dads (as she called them), ribbon roses, etc.  I have wanted a rack, too, but he never had the time to do it.  So when we were clearing out mom's sewing room, he simply unscrewed them from the walls, put temporary cardboard backs on them, and put them in the truck to take to me.  So Rob brought them upstairs (emptying the stacks of boxes in them first) Sunday, and screwed them to the wall with a couple of wall anchors.  I put the boxes back on the shelves in the rack until I can go through them... mom's system of organization was somewhat confusing.  I think this was due in part to the development of Parkinson's Dementia early on, as well as the brain tumor that was pressing on her nerves.  Sometimes I open a box of hers and see no rhyme or reason why things were put in it, and I just heave a big sigh.  I think sometimes she put things in boxes to just get them out of the way.  I know I do that sometimes, and I try not to, because I don't want my family to have to go through the same thing!

I moved the dresser, which will be used to store my model dolls, props, etc., and then Rob began to bring up boxes from the garage.  Most of the boxes he brought up, however, are things to sell or store elsewhere.  None of them are fabric bins.  The black plastic rack you see is temporarily holding small things while we move the big stuff. 

The next two pictures show the transfer of books and lace from two bookcases.  There will be more lace, and more books.  Trust me.  I know what's in the garage, and at least two large bins are full of carded lace. 


I moved the lace to the far left bookcase to make it more accessible.  I know there is stuff piled up at the base of the bookcase where the books are...I was in the process of organizing, and had a little pile-up there. 

The next few pictures are of organized chaos. I'll be working on those in my free time (free time??  When do I get that??).  I have magazines to go through (and with every one I added to the pile, I told myself I am stupid, stupid...being a hoarder!  How much money did I spend on these things??), boxes of individual stuff to organize, more plastic storage to purchase (specific types of boxes), etc.  It looks like a horrible mess, but it's really just kind of clutter while I reorganize the room.  It will get better, I promise!  I can't work in this kind of chaos!!


Cosmetically, I have new fabric for curtains, a slipcover for my sewing chair and the wooden chair (and chair pad for it), as well as paint for the drawers of the large dresser.  I bought three cans of spray paint in three different colors that coordinate with the curtains, as well as new drawer pulls, with which to redo those dresser drawers. 

This is just the start, of course.  My mother accumulated collections of, well... everything!  I'm certainly not going to be able to use it all, and have plans.  Some things I will be selling, such as dolls and doll accessories that are collectible.  I am planning to "destash" by making doll clothing kits (fabric, trims, buttons, etc.) and selling them online.  Some of the items in these large bins were put there just to make it easier to transport/move, so I'll be going through those, too. 

Lots of work!

Finally, Monday... We had a nice breakfast (Rob made chocolate croissants from a package he bought at Trader Joe's.  I've told him he can make them any time!!), and I spent some time cleaning up downstairs.  Ella joined me for a bit, but when I took a break, she decided she was done, and didn't go back to doing what I asked her to do.  Sigh.  After cooling off a bit, I picked up my hook and some yarn and made hats!  :)
Until later, have a great week!


Friday, February 22, 2019

Moving on...

Well, the project turned out nicely, and I think it was well-received.  So, now it's time to move on to other things.  Don't get me wrong--I'm going to keep the blog going, and we'll do 20 Time again 4th quarter.  So...

Projects I am currently focusing on:
  • Keeping my house clean (or clean-er)
  • Reorganizing and redecorating Ella's room
  • Reorganizing my bead storage
  • Napping
  • self-care
I am working on getting my daughter, Ella, to pick up after herself more often.  In cleaning her room, we're decluttering old toys, donating many things, and pretty much clearing out things she no longer wants to hang on to.  Stuffed animals...she wants to keep them all.  Old princess toys, out!  Barbies, out!  Baby toys, out!  Sentimental things, in!  Sigh... my little baby is growing up.  She's going to be 12 in May, and while she is still a kid in many ways, she's also becoming a teenager, and that means changes... moods, favorite things, wearing bras (a highly contested issue), talking about body parts (embarrassing for her!) and changes, you get the idea.  

But...on the other hand, she wants to be with me, and do things with me, and talk to me about things she cares about.  I'm enjoying that.  Sometimes, after a long day of human contacts at school, I want peace and silence, but I get my little chatterbox instead.  Sometimes, she wants to be quiet and alone, and now that we've cleaned her room, she wants to be in it.  I can understand that--I'm the same way!  She is very much like me in personality and interests.  She's very imaginative, creative, sometimes restless, has tons of ideas, loves to read, loves to write, uses big words (correctly!), and when she's in the mood, trying new things.  She's also quite stubborn.  Nut doesn't fall far from the tree...or rather, both parental branches!

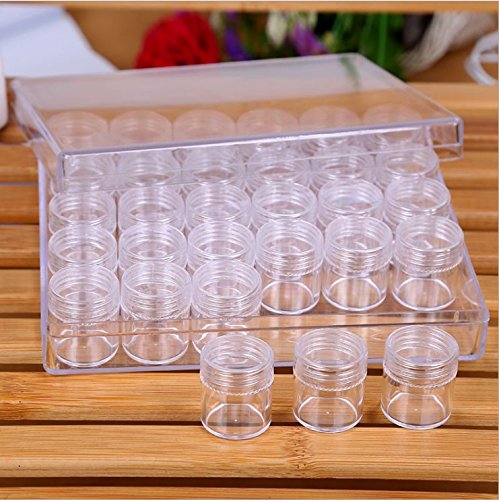
I discovered, much to my chagrin, that my old bead storage boxes (clear, hard plastic storage boxes with dividers inside--about 5" x 10") are not working for me anymore.  They are very slippery--and carrying more than two at a time has resulted in boxes crashing on the floor, and bead chaos.  They are also cracking in places.  Most of my recent bead storage involves clear plastic boxes filled with round bottles with screw tops.  These are much more secure than tubes, bottles, and jars with snap-on lids.  The old things' lids pop off, bottles/tubes crack, spill easily, etc.  I have these newer containers in multiple sizes--tall, wide ones for seed beads, short wide ones for flatter and larger beads, small cylinders for very small beads or small bead quantities, etc.  And I've gotten used to being able to pull a bottle and put it with other bottles to develop a project.  So those multiple-divider boxes are not conducive to that kind of work.  

Teemico 1 Set of Transparent Storage Box with 30 Slots for Nail Art Tools Storage Small Parts Beads Jewelry Make up Tools Organizer Container
My bead storage type for the last few years.
For Christmas, my mother-in-law bought me a new container system that I'd seen and was interested in, and put it on my Amazon shopping list.  These boxes are small, so perfect for small beads and quantities, and a lot of my beads are like that.  They are rectangular, with rounded bottoms, and a flip top that closes securely, all of which go in a tray that keeps them lined up neatly, and come with labels you can put on the white lids so that you can keep track of what kind of beads they are, where purchased, cost, etc.  I'm hooked on these boxes!  So I ordered two more from Amazon.  I'm in the process of filling the second tray, emptying the old boxes into individual small boxes, and I'm getting nervous...I only have one tray left!  So...I ordered two more--one with the tiny boxes in a tray, and one with multiple-sized boxes in a tray.  The trays also have locking lids, and stack nicely.  No slippage!


The result of this reorganization is that I will be able to more easily access my bead stash (I've been building it for at least 20 years), put projects together, and use some beads that I forgot I had.  Projects are spinning through my head as I do this, of course!  

Just thought I'd share with you... 

I'm expecting a few packages from Amazon tomorrow:  Bullet Journal supplies.  I'll blog about that soon.  And about other projects I'm developing, as well.  I'm also going to revamp the blog a bit.  I want lighter, brighter colors, and maybe a more broad title (meaning, less specific).

Thursday, February 7, 2019

The End!

I have pictures to share... when I was on campus, several people took pictures for me, so that I have the total effect ready.  I will post pictures of individual parts of the project later.  We are expecting more snow, so... who knows what fun we'll have?  I definitely want to show you details of the hat and the reticule, and construction details for the dress and such.

For now, here are pictures of me--these were taken by Mrs. Mulcahy, who had me do an "Oh, Mr. Darcy!" pose...


I did get the necklace made, and made some earrings to go with it.  Coral beads in 4 and 6mm graduated size, hand-knotted on dark rust silk cord.  The earrings have a silver filigree pendant with one coral bead as a drop at the end. 

This was actually fairly comfortable to wear.  My only problem was the stays.  If I am going to re-wear this outfit again, I need to make a new corset.  Mine was simply too big around, and I think too long in the back.  The boning in the back was definitely rubbing my lower back uncomfortably, and my arms had limited movement, due to the breadth of the front of the stays.  In future, I'll need to make a smaller size, and perhaps a shorter version--the long stays were too long for my short torso. 

It was also fairly easy to put on, if a little time-consuming.  The only part I had trouble with was the last part--threading my back ties through the thread loops (like belt loops, but to keep the sash in the correct position).  Fortunately, a colleague came in to the bathroom as I was struggling with the ties, and she helped me out. 

Otherwise, this was fun!  A lot of work, but that's not a bad thing.  Sometimes a lot of work is the most rewarding in the end. 

So... what did I learn through all of this? 

1.  My husband is destined for sainthood.  He was patient through the lack of housework, helped me make my dress form, bought me the dress form, was supportive through the whole process, and made dinner all weekend so that I could work. 

2.  I always bite off more than I can chew.  I was ambitious, and thought that because I'm a skilled and experienced seamstress, this would be easier than I thought.  But the patterns are different from modern dressmaking, and the instructions were not as clear as I would have liked.  There was much ripping out of stitches, swearing, and re-sewing.  I also didn't consider the sheer amount of fabric, and how that would take far longer than my usual sewing projects.  So this was definitely a challenge for me!  I understand patterns and construction better as a result of doing this project.

3.  I'm much smaller than I think I am.  My stays were at least four inches too large around my body.  This may mean that my dress form is too big/inaccurate.  I know I've lost a whole dress size in the last month and a half, but that doesn't account for the error.  Either I misread the instructions, or I made some calculation errors.  There's a lot more math and geometry in sewing than you'd think!  On the one hand, it caused a lot of problems, but on the other hand... I'm having a hard time finding a downside to finding out you aren't entirely as fat as you thought you were....  :)

4.  I don't need to do this again.  At least, not with a deadline--I did get stressed about it, and that's not good for my health.  I've got enough stress in my life as it is!  I'm relieved that the project is over, in that respect.  I still would like to sew more period costumes, but at my own pace, and in a bigger space.  My sewing area is very small, so I was constantly moving things around to accommodate the storage of materials and construction of this outfit.  I have multiple craft interests, and generally move from project to project according to my mood or inspiration.  I might spend a month on making cards, for example, and then spend two months on making jewelry, and during family time, work on a knitting, crocheting, or embroidery project.  So this felt confining and limiting to me. 

I hope you've enjoyed the journey with me!  I think I'm going to work on keeping this blog going, but writing about other things--perhaps other projects.  I can't be the only crafter out there!  :) 

Monday, February 4, 2019

Snow Day update

I'm a snow junkie, and I am loving every flake, drift and forecast when it's like this.  To me, it's simply not winter until we have had some snow.  And more than anything else, I'm so very grateful for a snow day.

This weekend was a doozie.  I was up late every night, working on getting this project complete.  Friday night, I stayed up until 3:30 am, finishing the sequin pattern on the last panel of my reticule.  Saturday, I cut out my spencer and finished the dress.  Sunday, I did all the hand finishing on the garments, finished my slip, cut out and sewed my reticule, and tackled my hat.  I was up late till 3, doing handwork and then worrying while trying to go to sleep, trying to remind myself what I needed to gather, how I was going to get dressed at work, etc., all the while wondering whether we would even have school today.

That doesn't sound like much, but it was a lot.  I did not sew my spencer.  The skirt of the dress was far more complicated than I expected, and when I finished it, I knew I was done.  There was no time for a spencer.  So... another time.

Checklist update:
  • chemise
  • stockings
  • shoes
  • stays
  • slip
  • dress
  • kerchief
  • cap
  • hat
  • mitts
  • reticule
I did not complete the spencer, as I said before, nor did I do the shawl.  The shawl is actually quite simple, but I'm really tired, and I just don't feel up to it.  I'm mentally and physically done with this project.  

Don't get me wrong--I've enjoyed it!  But spending every weekend for the last six weeks doing nothing but this project (and thus, letting housework, etc. get really neglected) has taken its toll.  My back and neck are killing me, my fingers are sore, and mentally, I'm ready to do something else.  I've been hankering to do some paper crafts.  I also really want to clean up and reorganize my bead storage and my paper crafting storage.  It's a cluttered mess... sigh.  

I do not have pictures to share at this point, but I'll take some.  I thought the hat would be more fun, and instead it was a total pain in the patella.  The truly fun piece was the reticule... mostly because everything went right on it.  Except that the heat of the iron did affect the older, smaller sequins I used on the first two panels.  The newer ones were heat resistant.  So I have two sides that are shiny and sparkly, and two sides that look a bit vintage.  Still shiny, but not so sparkly.  I did enjoy making the dress and other pieces, but man, that was a LOT of fabric!  For someone used to working with smaller sizes (dolls, kids, etc.), I was actually annoyed with how much the heaviness of the skirt was getting in the way!

However, it really did work out nicely, and I'm quite pleased with the end result.  Of course, the skirt itself was 6 inches too long!  I made a 1 1/2" hem (hemstitched!), and then had to make a 4" tuck all the way around... I knew I would possibly have to do that, but still... I was kind of surprised at how long it was--and how cumbersome!  But the tuck looks nice and sort of decorative--Yes, yes I did mean to do that!  :)  I wanted some sort of decoration on the hem, but most of the decorations for the time period were complicated, so... a simple tuck will do.  

And now that I have the time today, I'll see about making myself that coral necklace.  And maybe finish the bracelet, too...  At the moment, though, all I want to do is sleep.  

As for the end of the project--we were going to begin presentations today, and I was supposed to be the first to go.  I did not have time this weekend to create a short PowerPoint for it, so I will do that next.  One of the things the presentations need to address is what you learned through the process.  So... I'll post that part next!  Until then, nap on!  

Tuesday, January 29, 2019

Correcting Mistakes and Progress Update

After the depressing discovery of my oversized stays, I fixed them, mostly by taking some tucks/darts to reduce the overall length around me, and shortened the straps by two inches, so that they will actually hold the stays in their proper position, although they still fall off my shoulders.  I have narrow, sloping shoulders (Oh, how I miss shoulder pads!!), and most things I put on them fall down... my purse, tote bags, left bra strap (always!!  Very frustrating).

So... after taking in the stays, I tried them on, and Voila!!  It works!  I have the correct fitting, and silhouette.  I even have space between the bones in back where the lacing is!  Woohoo!!

(no, I'm not showing you pictures of the stays on me... my chemise is rather see-through, so I'm keeping this G-rated!)

Undergarments, check.  Time to make a mock-up of the dress bodice and check for fit.  This actually took very little time (a couple of hours), compared to all the other things I've made thus far.  I tried the mock-up on, and it fits almost perfectly.  However, I had to make an adjustment in my chemise--it was too high up for the bodice to completely cover up.  I was kind of surprised by that.  But, upon reflection, I remembered that the front part of the bodice that I made goes underneath the bib front, which comes up higher on the neckline than the bodice front.  Sooo... no wardrobe errors, here!  To compensate for the slight gapping there, I shortened the shoulder pieces by 1/4", and shortened the front panels by 1/3".  When I tied the front together, the front panels were overlapping, and thus, not short enough to close up that gap.

Hm.  Thought I had a picture of it.  Oh, well...

Part of the problem is that I bought those patterns just after Thanksgiving, and I've lost enough weight since then that my rings are looser, and I've gone down a size in my clothing, even my bra!  I did a little shopping after school last Thursday, and was surprised that my usual size was too big.  Feels kinda cool, actually.  :)  In my head, I'm much smaller, even though it doesn't show much in the mirror.  So... mini happy dance!

Making a mock-up wasn't a waste of time, and those were very easy fixes.  I was also worried about the sleeves--the back of the bodice is hexagonal (loosely), so the tops of the sleeves extend into the back, and having never made something like this, I had no idea how it would fit.  So... I did sleeves in the mock-up as well.  It's a good thing I did!  To make the sleeves set in properly, you need to gather in about 80% of the sleeve, and then adjust it to fit the curves of the armscye (sewing term for armhole).  I was a little confused as to how to spread the gathers out, so I ended up with gathers everywhere, instead of just in the shoulder area.  So my first sleeve is wonky and puffy in the wrong places, and kinda hangs funny.  The second sleeve, then, was better, as I knew where the shoulder was, and concentrated the gathers just in the shoulder area, using the rest of the gathers to slightly pull in (called "ease") the sleeve to fit the armscye where it is supposed to be flat.  This sleeve hangs properly, and doesn't puff out in back, and is more comfortable.

Poorly fitted sleeve
Properly fitted sleeve

The second thing I found on the sleeve is that it was about 4 inches too long for my arms.  I was doing a half-sleeve, ending around my elbows, but this length was more like 2/3 length.  Technically, I'm a petite size on top (in terms of length--I have a short torso, and little T-Rex arms), so the sizing of most "normal" lengths is usually too long on me.  I don't mind it in shirts, as I prefer them long (because I hate my belly), but it is usually a problem for more fitted garments, where the bust darts are in the wrong place, and sleeves are almost always too long for me.  Thus, I shortened the sleeve length.

Surprisingly, cutting out the dress took a while.  The skirt pattern is ginormous, and wouldn't fit on my kitchen table, so I was having to move it around and pin it to keep it from shifting the wrong way, and then discovered that my fabric width was two inches too short!!!  At first, I was upset, but then my little problem-solving brain kicked in gear, and I realized I'll simply have to use slightly shallower pleats to compensate for the shorter width.  No biggie.  :)

Ready to sew!!!

I was concerned with what I'd line the bodice with, as my muslin is white, and the fabric for the dress is cream-colored.  But I cut my pieces out so well that I had plenty of leftover material, and was able to do a self-fabric lining.  To make sure I didn't confuse the pieces (lining vs. print), I cut them upside-down and used the wrong side (unprinted) as the "right" side for the lining.  It's a little confusing, in terms of how I'm describing it, but it worked out fine.  Not that anybody will be seeing it, of course!

So yesterday, before taking Ella to the doctor, I had some time to sew, and I managed to complete the entire bodice as well as the bib front and ties...it helps that I'd made the mock-up the day before, so I knew all the steps and didn't need to refer to the instructions constantly.  Now all I need to do is complete the skirt, figure out how much I will need to shorten the length (again, 5' 4" doesn't really meet "average" height), hem it, and do hand-stitching on a few parts.

Underlining the neckline.  You stitch the lining of the bodice to the raw edges of the neckline a scant 1/8" from the actual seam.  This makes the lining roll under the edge of the seam, so that none of it peeks out.  It makes a nice, clean edge.

Finished underlining. You can see how I made the lining of the bodice the wrong side of the dress fabric. 

These are the ties for the dress.  They wrap around the front to tie in the back, which makes this dress easy to put on by yourself.  The bottom tie has been pressed, but the top one has just been turned right side out, thus showing why you have to press/iron the things down.  Not pretty!!

The real question for me is...will I have time to do the spencer (jacket) and the hat?  Hat, no big deal.  Jacket?  Possible big deal.  We'll see how the weekend turns out!  Oh--I remembered this morning that I still haven't made up a slip.  But that's super-easy.

Finished bodice front (the upside-down part won't be seen) on my sewing table.

Finished bodice on my dress form, which I suspect of being too big.  Sleeves are shorter than the mock-up, and there is a bigger gap between the front panels.  When the dress is all sewed, I will attach ties to the top, middle, and bottom of these front edges.  That brings the bodice together, and fits it to the torso.  You can see a vertical line/seam on the right side of bodice (as you're facing it), which is what will show.  The bib front will cover the ties and front panels.  
Here are two illustrations that show you how the bib front dress works--these use buttons to close up the front panels, and my pattern calls for ties.  Some front panels actually overlap, and at the time, were closed using straight pins!  I will not be using straight pins... I'm afraid of having them poke me!  I plan on using vintage mother-of-pearl buttons to hold up the bib instead of pins.

Bib Front  A pattern for the bodice (and instructions for the skirts) of a Regencyรข€¦

My dress is not designed for wraparound ties...mine are supposed to tie in a bow in the back.  I'd prefer wraparound, actually... my short arms don't reach comfortably behind my fat back, and the way I tie bows makes them go sideways or upside-down, and thus, look funky.  I may be able to make them wrap around...we'll see how it works out.

Thursday, January 24, 2019

Trying things on...

...and finding out they don't fit.  AFTER you've finished them! 

Sigh.

Because my husband sounded less than thrilled to lace up my stays, I looked up online how to lace stays by yourself.  So I gave it a try last night.  It was surprisingly easy, and worked fine. 

But... it's too big.  I think maybe my dress form might be a little off in its measurements, because it fits much differently on me!  I'm supposed to have at least an inch of gap between the boning at the center back, and mine were overlapping!!  And they just weren't fitting right. 

I went to bed last night, trying to figure out how I can fix this without having to redo the whole dang thing.  I will need to take it in both in the back and at the shoulder.  Not cool, but necessary.  I just don't have the time to redo it.  Later, I'll make a new one... as I've been slowly losing weight, it will definitely be a necessity later.  :) 

On the one hand, I'm frustrated, but on the other... I'm kind of glad.  I guess I'm smaller than I thought I was, and I'm having a hard time feeling bad about that part!  Another positive:  this means the size of my dress pattern will be easier to fit (I was anticipating having to do many alterations).  But it also makes me question how accurate my dress form really is...  hmm...

Back to the sewing table!

Tuesday, January 22, 2019

Shoes and Mitts

My last post was very long.  This one is short... but part of the update from the last post.

I finished my crocheted lace mitts:


I may add wrist ties (they were included in the pattern), as the wrinkles mid-wrist kinda bother me.  

I also bought shoes!  Here's a picture:

The shoes for the outfit are on the right, as are the stockings (in a package).  The adorable gray flats' kitten faces are in sparkly crystals.  I'm not a big cat fan, but these flats were too cute to pass up!  (and they were on sale) I haven't worn them yet... soon!!

Original shoes were very similar... pointy toes, flats, etc.  I would have preferred boots, but finding boots today that look like ones from the early 1800s are difficult, and expensive.  Sigh...

Shoes c. 1800, Worthing Museum and Art Gallery Costume Collection Shoes, 1815, Nasjonalmuseet
Shoes, 1800รข€™s England or Wales, Museum of Welsh Life
Gorgeous!  I should decorate my new shoes, but I want to wear them afterwards with pants, so I think I'll leave them plain for now.  

Women's Half Boots 1815-1820. Love the side lace ones.
Women's boots, British, 1790-1820, leather.
These were called "half-boots", kind of what we call a bootie these days.  


Time for an Update!

Sorry I haven't posted in a while...  busy days!

I spent my 3-day weekend mostly working on my project.  I have completed many things:

  • Chemise
  • Stays
  • Stockings
  • Shoes
  • cap
  • kerchief
  • mitts
I am in progress on the reticule (purse).  Some of you may remember seeing me work on it in class on Friday.  

What is left to complete:
  • slip
  • dress
  • spencer (jacket)
  • Hat
The slip is easy.  The dress I may need to size up a bit, depending on my measurements in full underwear.  

Speaking of full underwear... the stays have been quite a challenge.  The first time I held the adjusted lining up to my dress form, I was floored--the area for "the girls" was HUGE!  Flopping over!  So I adjusted them to fit the dress form, and I was pleased with the result.  But then I began to think... the purpose of the stays was to create the correct form, which was to lift the "girls" up, sort of like an 1800s Wonderbra.  Making my stays fit my dress form would have it retain a modern silhouette, unlike the "shelf" silhouette for the 1800s.  So... I had to unpick all of my binding, cut the lining and front slits and insert the gussets I had done originally.  This time, I also included a ribbon in the top bias binding in front, so that it can be adjusted to fit (ribbon ends stitched in at the far ends, with a buttonhole in center front, so that the two ribbons have ends hanging out to be tied)

A little infographic for you:

Stays - the Regency 'shelf' profile vs. the modern natural profile. Image @Oregon Regency Society

The stays over my practice chemise.
Flossing over the end of the hip gussets


From the back.  It does a good job of creating a nice silhouette, but the front was all wrong!


So... that was time-consuming.  Those extra 8 gussets also needed to be flossed, so... more handwork!  Flossing was done on stays at the points of gussets where the seam allowance tapered off.  By stitching over the points of the gusset, you secure the fabric so it won't shred or come apart there.  The stays were pretty time-consuming altogether.  Lots of details, lots of hand-stitching (all the seam binding at bottom and top were stitched on by machine, but had to be hand-stitched down on the inside).  I got the reeds to lie flatter (they were still curvy from being coiled) by steaming them with my iron.  I had to set all 28 grommets in one-by-one (noisy!  I knew I didn't have time to make them by hand (to be period correct... metal grommets didn't come out until after 1825.  But I felt that metal would be sturdier), so I banged away with my ball-peen hammer and setting tools for an hour or so.

Showing you the hand-stiched binding around the top of the stays.


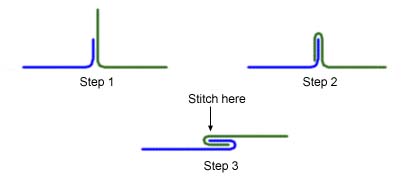
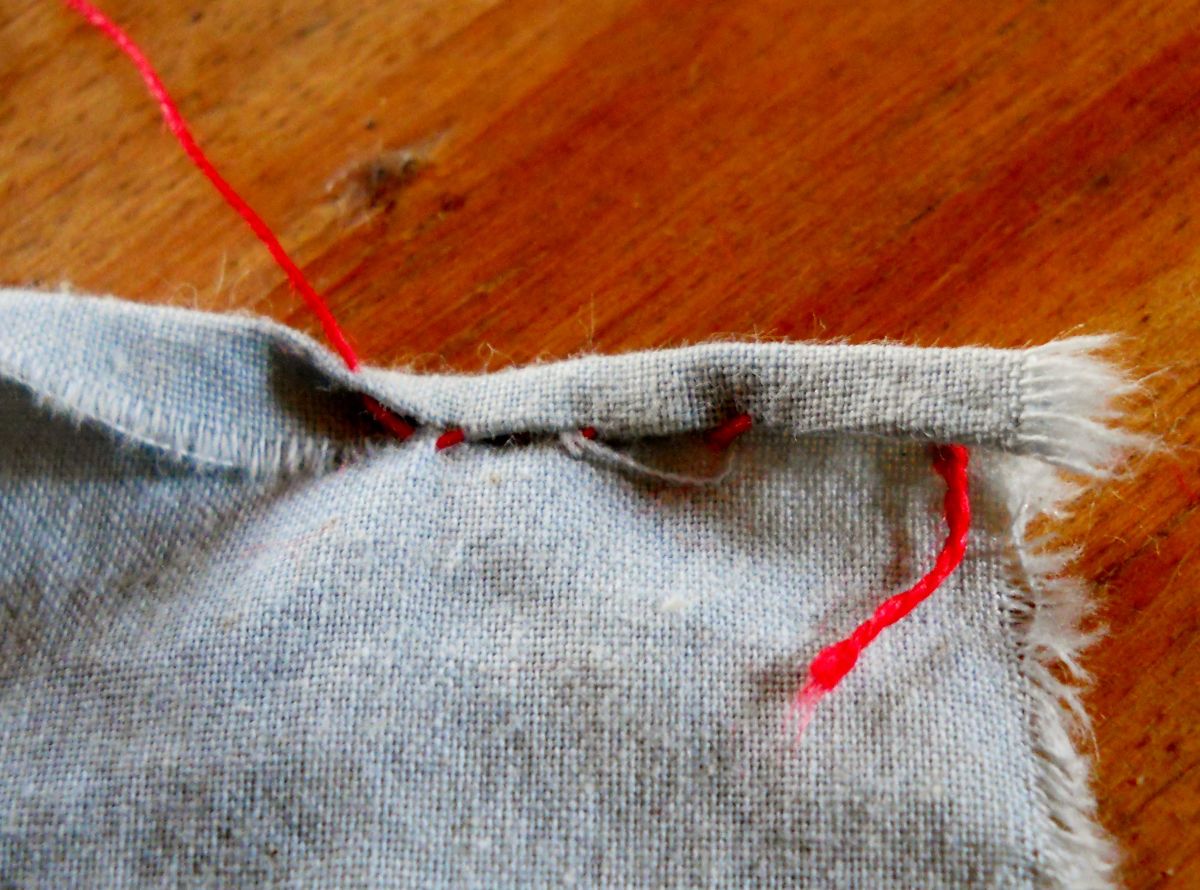
The Chemise took longer than I expected, because all the seams had to be flat-felled.  I'll see if I can find a quick link to explain it.  You have flat-felled seams on the long outside seam of your jeans, actually.  It's a way to finish the edges of fabric by turning them under and stitching them down.  I did my chemise on the machine... there's no way I could've done that by hand!!  I did do it by hand on my cap, though.  It was a little challenging, but it was the only proper way to finish the circular seam in the back.  

Image result for flat-felled seam
Flat-felled seams.

Speaking of my cap... I made a mock-up to test for fit, etc.  I made some adjustments to it, and then cut it out.  This fabric is so light that it is practically sheer!  I embroidered a circular back panel, using a pattern I found online (resource had three galleries of patterns ranging from the 1810s to the 1830s).  However, when I cut it out, I used the wrong pattern--the shorter length!  I didn't realize it until I actually put it on, and was curious why there weren't very many gathers.  But rather than throw it out, I decided that I liked it anyway, because it wasn't super-ruffly.  It feels like I have nothing on my head, it's so light.  I used about a yard of my finest lace--French Maline lace, which is a delicate cotton.  I bought it many years ago from my favorite lace seller, a Russian family, at Sew Expo.  

French Maline lace... super delicate and beautiful!

Fitting the lace to the edge of the cap.  To do this, you pull a thread at the heading of the lace (the plain edge) and gather it using that thread (it's put there for that purpose).  I didn't want my hat to be too foofy, so I let the gathered fabric make the ruffle, not the lace.

Ta-Daa!  stitched down.
Mock-up in plain cotton muslin
Embroidery in progress
Finished embroidery panel and mock-up cap back, showing you where the panel should go.


I have to say that I've been enjoying using fine fabrics on this project...fine Swiss batiste for the cap (soft as butter), the lovely cotton sateen for the corset (felt like silk satin ribbon), and the fine handkerchief batiste for the Chemise.  When I hand-rolled the long bias edge of my fichu, it was so nice to have fabric so fine that you could get a nice fold on the edge just by using the heat of your fingers.  Luxury!!  I made the fichu of the same material as the cap, as it would have been in the time period.  I put a nice cotton lace on the flat sides of the fichu for decoration, and hand-rolled a hem on the bias seam.  

Related image
hand-rolling...I don't know why her edges are all frayed.  
Image result for hand rolled hem
After a few stitches, you pull on your thread, and magically, the top rolls to the bottom.  


Finally, I have half the panels of my bag done.  I need to do two more, but I'd run out of sequins.  So I did a rush order at Cartwright's Sequins, which arrived Saturday.  That's all the hand work I have left to do.  I finished my second mitt Friday evening.  


Living with Jane: Embroidered Regency Reticule: Part 1
The original
Drawstring bag. American, about 1800. Cross barred cotton, embroidery - in the Museum of Fine Arts Boston costume collection. (This says embroidery, but when you zoom in on the picture it's actually metal spangles embroidered onto the purse.)
Main panel of the original
Whew!  But with all the basics done, I am ready to do the actual dress.  I'll do a mock-up of the bodice this week, so that I can see what I need to do to make it fit properly.