...and finding out they don't fit. AFTER you've finished them!
Sigh.
Because my husband sounded less than thrilled to lace up my stays, I looked up online how to lace stays by yourself. So I gave it a try last night. It was surprisingly easy, and worked fine.
But... it's too big. I think maybe my dress form might be a little off in its measurements, because it fits much differently on me! I'm supposed to have at least an inch of gap between the boning at the center back, and mine were overlapping!! And they just weren't fitting right.
I went to bed last night, trying to figure out how I can fix this without having to redo the whole dang thing. I will need to take it in both in the back and at the shoulder. Not cool, but necessary. I just don't have the time to redo it. Later, I'll make a new one... as I've been slowly losing weight, it will definitely be a necessity later. :)
On the one hand, I'm frustrated, but on the other... I'm kind of glad. I guess I'm smaller than I thought I was, and I'm having a hard time feeling bad about that part! Another positive: this means the size of my dress pattern will be easier to fit (I was anticipating having to do many alterations). But it also makes me question how accurate my dress form really is... hmm...
Back to the sewing table!
Showing posts with label reed boning. Show all posts
Showing posts with label reed boning. Show all posts
Thursday, January 24, 2019
Tuesday, January 22, 2019
Time for an Update!
Sorry I haven't posted in a while... busy days!
I spent my 3-day weekend mostly working on my project. I have completed many things:


I spent my 3-day weekend mostly working on my project. I have completed many things:
- Chemise
- Stays
- Stockings
- Shoes
- cap
- kerchief
- mitts
I am in progress on the reticule (purse). Some of you may remember seeing me work on it in class on Friday.
What is left to complete:
- slip
- dress
- spencer (jacket)
- Hat
The slip is easy. The dress I may need to size up a bit, depending on my measurements in full underwear.
Speaking of full underwear... the stays have been quite a challenge. The first time I held the adjusted lining up to my dress form, I was floored--the area for "the girls" was HUGE! Flopping over! So I adjusted them to fit the dress form, and I was pleased with the result. But then I began to think... the purpose of the stays was to create the correct form, which was to lift the "girls" up, sort of like an 1800s Wonderbra. Making my stays fit my dress form would have it retain a modern silhouette, unlike the "shelf" silhouette for the 1800s. So... I had to unpick all of my binding, cut the lining and front slits and insert the gussets I had done originally. This time, I also included a ribbon in the top bias binding in front, so that it can be adjusted to fit (ribbon ends stitched in at the far ends, with a buttonhole in center front, so that the two ribbons have ends hanging out to be tied)
A little infographic for you:

A little infographic for you:
 |
| The stays over my practice chemise. |
 |
| Flossing over the end of the hip gussets |
 |
| From the back. It does a good job of creating a nice silhouette, but the front was all wrong! |
So... that was time-consuming. Those extra 8 gussets also needed to be flossed, so... more handwork! Flossing was done on stays at the points of gussets where the seam allowance tapered off. By stitching over the points of the gusset, you secure the fabric so it won't shred or come apart there. The stays were pretty time-consuming altogether. Lots of details, lots of hand-stitching (all the seam binding at bottom and top were stitched on by machine, but had to be hand-stitched down on the inside). I got the reeds to lie flatter (they were still curvy from being coiled) by steaming them with my iron. I had to set all 28 grommets in one-by-one (noisy! I knew I didn't have time to make them by hand (to be period correct... metal grommets didn't come out until after 1825. But I felt that metal would be sturdier), so I banged away with my ball-peen hammer and setting tools for an hour or so.
 |
| Showing you the hand-stiched binding around the top of the stays. |
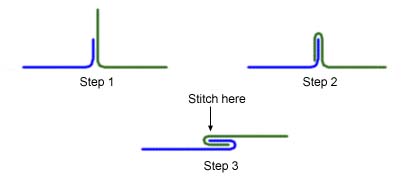
The Chemise took longer than I expected, because all the seams had to be flat-felled. I'll see if I can find a quick link to explain it. You have flat-felled seams on the long outside seam of your jeans, actually. It's a way to finish the edges of fabric by turning them under and stitching them down. I did my chemise on the machine... there's no way I could've done that by hand!! I did do it by hand on my cap, though. It was a little challenging, but it was the only proper way to finish the circular seam in the back.
 |
| Flat-felled seams. |
Speaking of my cap... I made a mock-up to test for fit, etc. I made some adjustments to it, and then cut it out. This fabric is so light that it is practically sheer! I embroidered a circular back panel, using a pattern I found online (resource had three galleries of patterns ranging from the 1810s to the 1830s). However, when I cut it out, I used the wrong pattern--the shorter length! I didn't realize it until I actually put it on, and was curious why there weren't very many gathers. But rather than throw it out, I decided that I liked it anyway, because it wasn't super-ruffly. It feels like I have nothing on my head, it's so light. I used about a yard of my finest lace--French Maline lace, which is a delicate cotton. I bought it many years ago from my favorite lace seller, a Russian family, at Sew Expo.
 |
| French Maline lace... super delicate and beautiful! |
 |
| Fitting the lace to the edge of the cap. To do this, you pull a thread at the heading of the lace (the plain edge) and gather it using that thread (it's put there for that purpose). I didn't want my hat to be too foofy, so I let the gathered fabric make the ruffle, not the lace. |
 |
| Ta-Daa! stitched down. |
 |
| Mock-up in plain cotton muslin |
 |
| Embroidery in progress |
 |
| Finished embroidery panel and mock-up cap back, showing you where the panel should go. |
I have to say that I've been enjoying using fine fabrics on this project...fine Swiss batiste for the cap (soft as butter), the lovely cotton sateen for the corset (felt like silk satin ribbon), and the fine handkerchief batiste for the Chemise. When I hand-rolled the long bias edge of my fichu, it was so nice to have fabric so fine that you could get a nice fold on the edge just by using the heat of your fingers. Luxury!! I made the fichu of the same material as the cap, as it would have been in the time period. I put a nice cotton lace on the flat sides of the fichu for decoration, and hand-rolled a hem on the bias seam.
 |
| hand-rolling...I don't know why her edges are all frayed. |
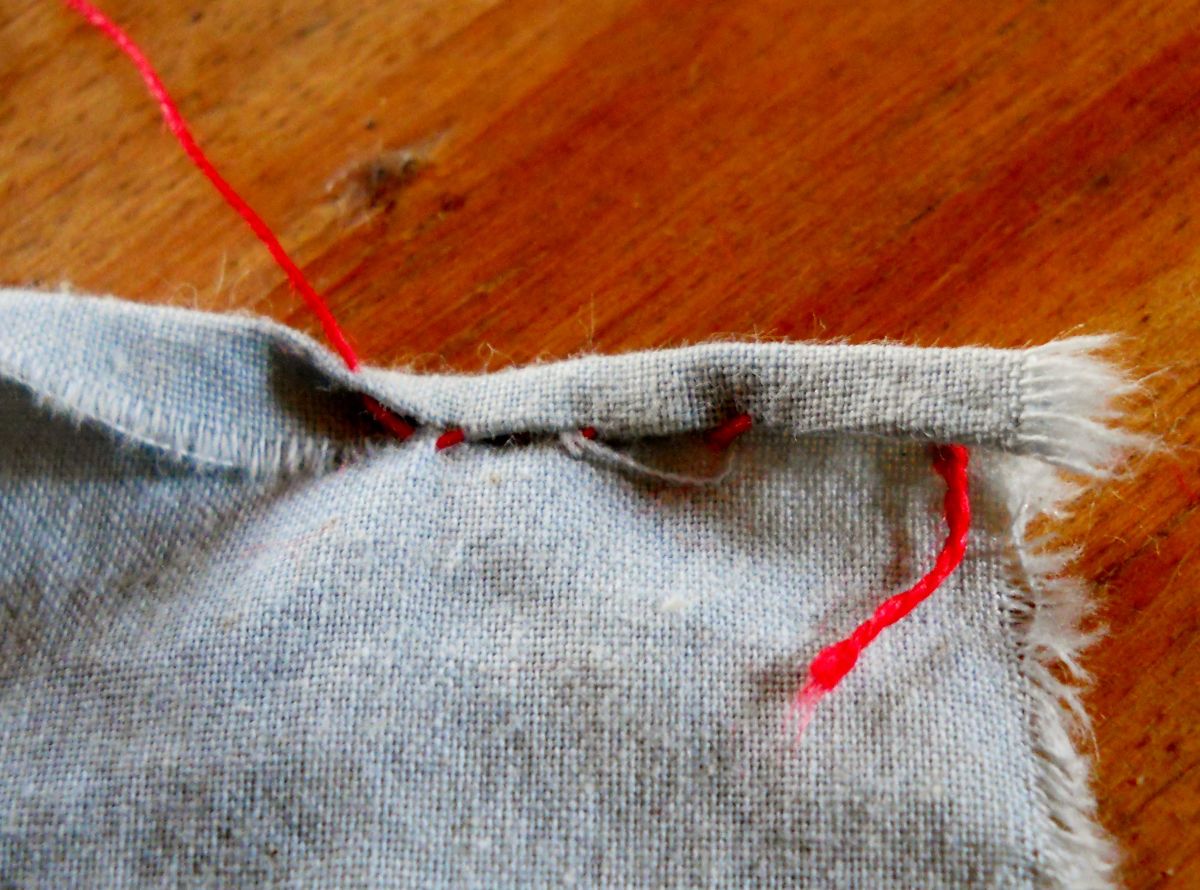 |
| After a few stitches, you pull on your thread, and magically, the top rolls to the bottom. |
Finally, I have half the panels of my bag done. I need to do two more, but I'd run out of sequins. So I did a rush order at Cartwright's Sequins, which arrived Saturday. That's all the hand work I have left to do. I finished my second mitt Friday evening.


 |
| The original |
 |
| Main panel of the original |
Whew! But with all the basics done, I am ready to do the actual dress. I'll do a mock-up of the bodice this week, so that I can see what I need to do to make it fit properly.
Tuesday, December 18, 2018
Gathering materials
Boning? Yep... to make a corset, you have to have boning. It's what gives the corset shape and support. There are many kids, including plastic stuff you can get at JoAnn's, but I know that is not authentic material for the early 1800s. So, I did some research. I could have got spring-steel circular boning (see picture), but you also have to buy a $45 tool to cut it, plus the little metal tips to prevent the steel from shredding the fabric and your skin. So I opted for reed. Reed is a natural material that is stripped into a specific shape, then coiled and boiled in that shape, and then allowed to dry. It was $25 for the coil of reed, but you can't buy it in any other quantity than a coil. It is also used to make hoop skirt supports... maybe another project somewhere down the road?
The cane is larger and more rigid than I expected. I think it will be perfect for my corset/stays.
 |
| Reed Boning--easy to cut and shape, with sanded edges. |
  |
| Spring Steel boning...I don't want those pointy bits poking me!! These are the end caps for cut steel. Bleah. |
I have also been thinking about things I can work on in class. I can do hand sewing, which I will do for some of the outfit (I will machine sew the parts that won't really show--skirt seams, etc.). I am going to make a reticule to go with the outfit. I haven't decided on the material for the outside of the bag... something soft but sturdy. Not leather, although soft leathers do exist. Not satin--I don't want something too fancy. I was thinking I could dye leftover sateen from my corset material... I did order extra! :)
The historic example of a reticule is fairly simple. I can imitate the muted paillettes (sequins, which were metal in the 1800s) with some matte silver sequins I have in my sequins box. Yes, I have a box of sequins! Harville is an omnicrafter, and I use sequins in all kinds of stuff.

I've found a pattern that is very similar to this one, which I will alter a little so that it has the longer point on it than the pattern I've found. It will be lined, of course, and TASSELS!!!
I am also going to make myself a replica bracelet. I found a picture of this bracelet online, and it is part of the Jane Austen collection, which includes an amber cross and a turquoise ring. I can't make things like that, but I can work with seed beads! Looking at the details of this bracelet, I can totally make it. I had to order a nice box clasp for it, though. I bought vintage Venetian glass beads at Shipwreck, and have milky white glass beads, as well as gold beads. It is simple--Right angle weave and netting. No problem!! Just a bit tedious, as the beads are small, and that takes time. But I can also work on that in class on Fridays.
Here is the bracelet:

Well, it's bedtime, so... see you soon!
Subscribe to:
Posts (Atom)