Showing posts with label bracelet. Show all posts

Monday, February 4, 2019

Snow Day update

I'm a snow junkie, and I am loving every flake, drift and forecast when it's like this.  To me, it's simply not winter until we have had some snow.  And more than anything else, I'm so very grateful for a snow day.

This weekend was a doozie.  I was up late every night, working on getting this project complete.  Friday night, I stayed up until 3:30 am, finishing the sequin pattern on the last panel of my reticule.  Saturday, I cut out my spencer and finished the dress.  Sunday, I did all the hand finishing on the garments, finished my slip, cut out and sewed my reticule, and tackled my hat.  I was up late till 3, doing handwork and then worrying while trying to go to sleep, trying to remind myself what I needed to gather, how I was going to get dressed at work, etc., all the while wondering whether we would even have school today.

That doesn't sound like much, but it was a lot.  I did not sew my spencer.  The skirt of the dress was far more complicated than I expected, and when I finished it, I knew I was done.  There was no time for a spencer.  So... another time.

Checklist update:
  • chemise
  • stockings
  • shoes
  • stays
  • slip
  • dress
  • kerchief
  • cap
  • hat
  • mitts
  • reticule
I did not complete the spencer, as I said before, nor did I do the shawl.  The shawl is actually quite simple, but I'm really tired, and I just don't feel up to it.  I'm mentally and physically done with this project.  

Don't get me wrong--I've enjoyed it!  But spending every weekend for the last six weeks doing nothing but this project (and thus, letting housework, etc. get really neglected) has taken its toll.  My back and neck are killing me, my fingers are sore, and mentally, I'm ready to do something else.  I've been hankering to do some paper crafts.  I also really want to clean up and reorganize my bead storage and my paper crafting storage.  It's a cluttered mess... sigh.  

I do not have pictures to share at this point, but I'll take some.  I thought the hat would be more fun, and instead it was a total pain in the patella.  The truly fun piece was the reticule... mostly because everything went right on it.  Except that the heat of the iron did affect the older, smaller sequins I used on the first two panels.  The newer ones were heat resistant.  So I have two sides that are shiny and sparkly, and two sides that look a bit vintage.  Still shiny, but not so sparkly.  I did enjoy making the dress and other pieces, but man, that was a LOT of fabric!  For someone used to working with smaller sizes (dolls, kids, etc.), I was actually annoyed with how much the heaviness of the skirt was getting in the way!

However, it really did work out nicely, and I'm quite pleased with the end result.  Of course, the skirt itself was 6 inches too long!  I made a 1 1/2" hem (hemstitched!), and then had to make a 4" tuck all the way around... I knew I would possibly have to do that, but still... I was kind of surprised at how long it was--and how cumbersome!  But the tuck looks nice and sort of decorative--Yes, yes I did mean to do that!  :)  I wanted some sort of decoration on the hem, but most of the decorations for the time period were complicated, so... a simple tuck will do.  

And now that I have the time today, I'll see about making myself that coral necklace.  And maybe finish the bracelet, too...  At the moment, though, all I want to do is sleep.  

As for the end of the project--we were going to begin presentations today, and I was supposed to be the first to go.  I did not have time this weekend to create a short PowerPoint for it, so I will do that next.  One of the things the presentations need to address is what you learned through the process.  So... I'll post that part next!  Until then, nap on!  

Tuesday, January 8, 2019

Making Progress...kinda

Since my last post, I've made progress on my various sub-projects. These are all parts of the main goal, but they do take time.

On New Year's Day, my husband, Rob, and I made a duct-tape body double of my torso to put over my new dress form. We did this for two reasons: the dress form was a bit smaller than me, and my body has rounded parts that are not necessarily standard on dress forms.

This was fun to do, partly because I like working on projects with Rob (he frequently thinks of things I don't, and he has often helped me with my creative ideas), and partly because I've wanted to do this for years. It took longer than the tutorials I watched, probably because I'm larger than the people in the tutes, and we'd never done this before, so we needed to problem solve as we progressed. But Rob and I are both kind of perfectionists, so we both wanted to do it right.

I'm not a fan of silver duct tape...I find it kind of hard on my eyes, as it is reflective. So after grabbing a ginormous roll of silver, I opted to get a roll of extra strong white tape. We decided to use this for the second layer.  The first layer was rather soft, not what I was expecting. But that also explained why so many of the people I watched had really squishy results. The best video (linked here) recommended three layers, but we decided two was plenty. We were almost out of tape after the second layer, and as I was fairly immobile, wrapped in layers of webbing and polymer, I was not really able to travel. It was a bit like armor, and kind of cool in that respect. But I couldn't bend, slouch, or sit, and 2 1/2 hours of standing in uncomfortable shoes had taken its toll, and Rob had developed two blisters from all the tape cutting. We managed to gum up three pairs of scissors, too! I de-gummed them today with acetone.

When Rob cut the form up the center back, it was such a relief! I had to go to the bathroom, my back and feet hurt, and it was almost time for me to start making dinner. We hung the taped shell of my body on the dress form, just to see how it looked. It was a humbling experience. I hate my belly enough as it is, but seeing what I look like in 3D, well... let's just say I have inspiration for more weight loss. I'm currently at the lowest weight I've been in about 20 years, but there's certainly more to lose!


I've been busy with returning to work last week, but I've been working on other parts of the project. I'm tired when I get home, so I don't often have the motivation to do projects that involve several hours on weeknights. So, I crocheted one of the mitts I posted last week, and as you saw on Friday, I worked on the bracelet in class. I did more on it Friday evening...it's now about 2/3 finished.

In order to work on this project in my very small sewing space, I had to clear a lot of accumulated clutter. That actually was really good for me, and I'm donating some of what I unearthed to Ms. Sinclair's supplies. ☺️ And now I actually have room to work in there. That was Saturday.

Today, I padded and stuffed my dress form, and taped up the back to make it permanent. It's very cool to be able to try things on the form. I checked the measurements, and it's pretty much exact. When I was done with that, I got to break out my patterns, cut out the parts I needed, and figure out the measurements for the corset. This was surprisingly challenging! You have to use very specific measurements to determine size, and then what size to cut the gusset panels. It was more complicated than I expected it to be!


So... now I have a fully functional dress form, accurate pattern pieces ready to put to the test, and a clean sewing space. Woohoo! (ignore the crap on the floor under my computer desk...empty bag of stuffing, recycling, papers to file... and the top of my desk has accumulated clutter...I was kinda just tossing stuff on there while cleaning the rest of the area!)

Here is my progress on the bracelet:

What most of you saw me doing in class...

Just a bit more to go, and this part will be complete!

This week, I will work on my other mitt (I brought the first one to class on Friday), cut out the chemise and corset test fabric, sew them up, and hopefully finish the bracelet.

I met a friend for lunch on Saturday, and afterwards we went to Shipwreck beads. I picked up some coral beads in two sizes. Coral was a popular material for jewelry, and people from  the late 1700s through the mid- 1800s believed coral had health benefits. So if I have time, I might knot myself a necklace (beads strung on silk cord with knots between each bead).


Friday, December 21, 2018

Supplies for Bracelet

First day of Winter Break, and I spent it running errands and doing major Christmas grocery shopping.  Ran to the West Side to get books at Barnes and Noble (because I forgot about them until it was too late to order from Amazon), and to pick up some kitchen items for my dad.  Then went to WinCo.  Got home just in time to take  my daughter to the doctor after her school got out.  As suspected, she has a sinus infection.  So... afterwards, ran to Safeway and Costco to pick up things that I chose not to get at WinCo, and came home with very sore feet.  Surprisingly, Costco was far less crowded than I expected.  It was about 5, so I'm guessing people were on their way home, having dinner, etc.  I had a breakfast sandwich at 11:30 (but didn't finish it... stress nausea) and then didn't eat anything until 7:30.  Christmas and stress have been making me eat a lot less, so, unlike some people, I've been losing weight over the holidays!

Ok, enough about my personal life.  I wanted to show you my materials for the bracelet I posted about last time.  I had to order a clasp online... multi-strand box clasps are hard to find.  I can't get one that looks like Jane's, but I got a nice one--gold-filled filigree.  Very petite.  It arrived Thursday.  So, I took a picture of all my supplies earlier in the morning today.  I'm looking forward to working on it!


I'm waiting for UPS to deliver my 7-lb box of fabric!  It was supposed to arrive today, but it has not... hoping it arrives soon...

Tuesday, December 18, 2018

Gathering materials


Ahh... the joys of anticipation have begun!  Last week, I ordered fabric for my ensemble, and now I'm waiting for it to arrive.  I think I got all I need for the outfit, spencer, underthings, and dress.  I got the boning in the mail today.

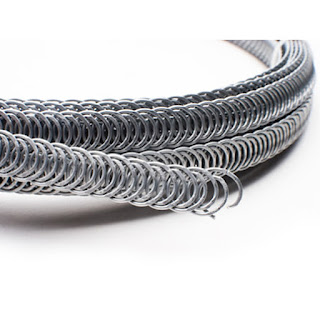
Boning?  Yep... to make a corset, you have to have boning.  It's what gives the corset shape and support.  There are many kids, including plastic stuff you can get at JoAnn's, but I know that is not authentic material for the early 1800s.  So, I did some research.  I could have got spring-steel circular boning (see picture), but you also have to buy a $45 tool to cut it, plus the little metal tips to prevent the steel from shredding the fabric and your skin.  So I opted for reed.  Reed is a natural material that is stripped into a specific shape, then coiled and boiled in that shape, and then allowed to dry.  It was $25 for the coil of reed, but you can't buy it in any other quantity than a coil.  It is also used to make hoop skirt supports... maybe another project somewhere down the road?

The cane is larger and more rigid than I expected.  I think it will be perfect for my corset/stays.

Reed Boning--easy to cut and shape, with sanded edges.
Spring Steel boning...I don't want those pointy bits poking me!!  These are the end caps for cut steel.  Bleah.


I have also been thinking about things I can work on in class.  I can do hand sewing, which I will do for some of the outfit (I will machine sew the parts that won't really show--skirt seams, etc.).  I am going to make a reticule to go with the outfit.  I haven't decided on the material for the outside of the bag... something soft but sturdy.  Not leather, although soft leathers do exist.  Not satin--I don't want something too fancy.  I was thinking I could dye leftover sateen from my corset material... I did order extra!  :)

The historic example of a reticule is fairly simple.  I can imitate the muted paillettes (sequins, which were metal in the 1800s) with some matte silver sequins I have in my sequins box.  Yes, I have a box of sequins!  Harville is an omnicrafter, and I use sequins in all kinds of stuff.

I've found a pattern that is very similar to this one, which I will alter a little so that it has the longer point on it than the pattern I've found.  It will be lined, of course, and TASSELS!!!

I am also going to make myself a replica bracelet.  I found a picture of this bracelet online, and it is part of the Jane Austen collection, which includes an amber cross and a turquoise ring.  I can't make things like that, but I can work with seed beads!  Looking at the details of this bracelet, I can totally make it.  I had to order a nice box clasp for it, though.  I bought vintage Venetian glass beads at Shipwreck, and have milky white glass beads, as well as gold beads.  It is simple--Right angle weave and netting.  No problem!!  Just a bit tedious, as the beads are small, and that takes time.  But I can also work on that in class on Fridays.

Here is the bracelet:


Well, it's bedtime, so... see you soon!