...and finding out they don't fit. AFTER you've finished them!
Sigh.
Because my husband sounded less than thrilled to lace up my stays, I looked up online how to lace stays by yourself. So I gave it a try last night. It was surprisingly easy, and worked fine.
But... it's too big. I think maybe my dress form might be a little off in its measurements, because it fits much differently on me! I'm supposed to have at least an inch of gap between the boning at the center back, and mine were overlapping!! And they just weren't fitting right.
I went to bed last night, trying to figure out how I can fix this without having to redo the whole dang thing. I will need to take it in both in the back and at the shoulder. Not cool, but necessary. I just don't have the time to redo it. Later, I'll make a new one... as I've been slowly losing weight, it will definitely be a necessity later. :)
On the one hand, I'm frustrated, but on the other... I'm kind of glad. I guess I'm smaller than I thought I was, and I'm having a hard time feeling bad about that part! Another positive: this means the size of my dress pattern will be easier to fit (I was anticipating having to do many alterations). But it also makes me question how accurate my dress form really is... hmm...
Back to the sewing table!
Thursday, January 24, 2019

Tuesday, January 22, 2019
Shoes and Mitts
My last post was very long. This one is short... but part of the update from the last post.
I finished my crocheted lace mitts:


I also bought shoes! Here's a picture:
Original shoes were very similar... pointy toes, flats, etc. I would have preferred boots, but finding boots today that look like ones from the early 1800s are difficult, and expensive. Sigh...


I finished my crocheted lace mitts:


 |
| I may add wrist ties (they were included in the pattern), as the wrinkles mid-wrist kinda bother me. |
I also bought shoes! Here's a picture:
 |
| The shoes for the outfit are on the right, as are the stockings (in a package). The adorable gray flats' kitten faces are in sparkly crystals. I'm not a big cat fan, but these flats were too cute to pass up! (and they were on sale) I haven't worn them yet... soon!! |
Original shoes were very similar... pointy toes, flats, etc. I would have preferred boots, but finding boots today that look like ones from the early 1800s are difficult, and expensive. Sigh...
 |
| Gorgeous! I should decorate my new shoes, but I want to wear them afterwards with pants, so I think I'll leave them plain for now. |
 |
| These were called "half-boots", kind of what we call a bootie these days. |
Time for an Update!
Sorry I haven't posted in a while... busy days!
I spent my 3-day weekend mostly working on my project. I have completed many things:


I spent my 3-day weekend mostly working on my project. I have completed many things:
- Chemise
- Stays
- Stockings
- Shoes
- cap
- kerchief
- mitts
I am in progress on the reticule (purse). Some of you may remember seeing me work on it in class on Friday.
What is left to complete:
- slip
- dress
- spencer (jacket)
- Hat
The slip is easy. The dress I may need to size up a bit, depending on my measurements in full underwear.
Speaking of full underwear... the stays have been quite a challenge. The first time I held the adjusted lining up to my dress form, I was floored--the area for "the girls" was HUGE! Flopping over! So I adjusted them to fit the dress form, and I was pleased with the result. But then I began to think... the purpose of the stays was to create the correct form, which was to lift the "girls" up, sort of like an 1800s Wonderbra. Making my stays fit my dress form would have it retain a modern silhouette, unlike the "shelf" silhouette for the 1800s. So... I had to unpick all of my binding, cut the lining and front slits and insert the gussets I had done originally. This time, I also included a ribbon in the top bias binding in front, so that it can be adjusted to fit (ribbon ends stitched in at the far ends, with a buttonhole in center front, so that the two ribbons have ends hanging out to be tied)
A little infographic for you:

A little infographic for you:
 |
| The stays over my practice chemise. |
 |
| Flossing over the end of the hip gussets |
 |
| From the back. It does a good job of creating a nice silhouette, but the front was all wrong! |
So... that was time-consuming. Those extra 8 gussets also needed to be flossed, so... more handwork! Flossing was done on stays at the points of gussets where the seam allowance tapered off. By stitching over the points of the gusset, you secure the fabric so it won't shred or come apart there. The stays were pretty time-consuming altogether. Lots of details, lots of hand-stitching (all the seam binding at bottom and top were stitched on by machine, but had to be hand-stitched down on the inside). I got the reeds to lie flatter (they were still curvy from being coiled) by steaming them with my iron. I had to set all 28 grommets in one-by-one (noisy! I knew I didn't have time to make them by hand (to be period correct... metal grommets didn't come out until after 1825. But I felt that metal would be sturdier), so I banged away with my ball-peen hammer and setting tools for an hour or so.
 |
| Showing you the hand-stiched binding around the top of the stays. |
The Chemise took longer than I expected, because all the seams had to be flat-felled. I'll see if I can find a quick link to explain it. You have flat-felled seams on the long outside seam of your jeans, actually. It's a way to finish the edges of fabric by turning them under and stitching them down. I did my chemise on the machine... there's no way I could've done that by hand!! I did do it by hand on my cap, though. It was a little challenging, but it was the only proper way to finish the circular seam in the back.
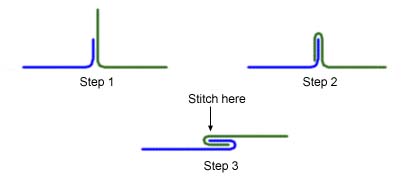 |
| Flat-felled seams. |
Speaking of my cap... I made a mock-up to test for fit, etc. I made some adjustments to it, and then cut it out. This fabric is so light that it is practically sheer! I embroidered a circular back panel, using a pattern I found online (resource had three galleries of patterns ranging from the 1810s to the 1830s). However, when I cut it out, I used the wrong pattern--the shorter length! I didn't realize it until I actually put it on, and was curious why there weren't very many gathers. But rather than throw it out, I decided that I liked it anyway, because it wasn't super-ruffly. It feels like I have nothing on my head, it's so light. I used about a yard of my finest lace--French Maline lace, which is a delicate cotton. I bought it many years ago from my favorite lace seller, a Russian family, at Sew Expo.
 |
| French Maline lace... super delicate and beautiful! |
 |
| Fitting the lace to the edge of the cap. To do this, you pull a thread at the heading of the lace (the plain edge) and gather it using that thread (it's put there for that purpose). I didn't want my hat to be too foofy, so I let the gathered fabric make the ruffle, not the lace. |
 |
| Ta-Daa! stitched down. |
 |
| Mock-up in plain cotton muslin |
 |
| Embroidery in progress |

 |
| Finished embroidery panel and mock-up cap back, showing you where the panel should go. |
I have to say that I've been enjoying using fine fabrics on this project...fine Swiss batiste for the cap (soft as butter), the lovely cotton sateen for the corset (felt like silk satin ribbon), and the fine handkerchief batiste for the Chemise. When I hand-rolled the long bias edge of my fichu, it was so nice to have fabric so fine that you could get a nice fold on the edge just by using the heat of your fingers. Luxury!! I made the fichu of the same material as the cap, as it would have been in the time period. I put a nice cotton lace on the flat sides of the fichu for decoration, and hand-rolled a hem on the bias seam.
 |
| hand-rolling...I don't know why her edges are all frayed. |
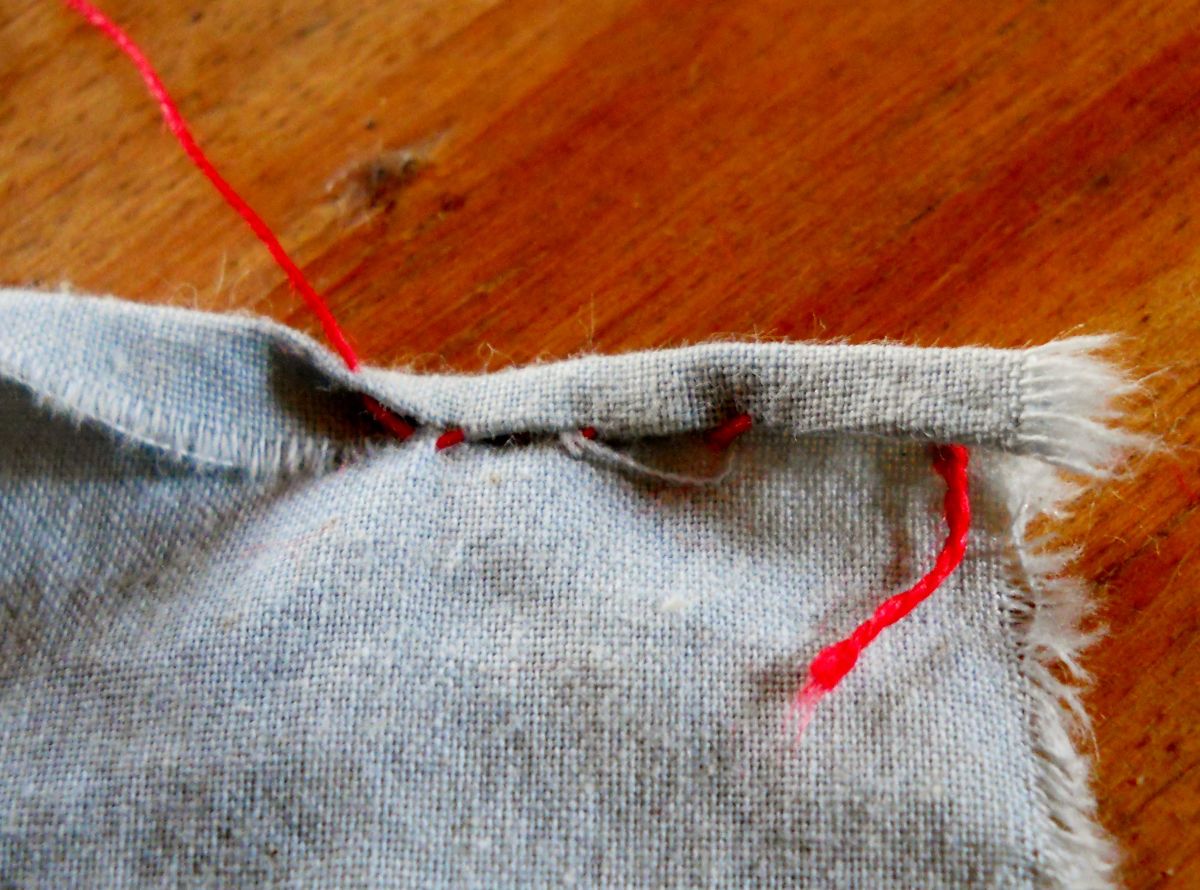 |
| After a few stitches, you pull on your thread, and magically, the top rolls to the bottom. |
Finally, I have half the panels of my bag done. I need to do two more, but I'd run out of sequins. So I did a rush order at Cartwright's Sequins, which arrived Saturday. That's all the hand work I have left to do. I finished my second mitt Friday evening.


 |
| The original |
 |
| Main panel of the original |
Whew! But with all the basics done, I am ready to do the actual dress. I'll do a mock-up of the bodice this week, so that I can see what I need to do to make it fit properly.
Thursday, January 10, 2019
Getting Dressed in 1816
I was working during my lunch today, and decided to prepare for 6th by going to YouTube to get to the video I want to show today.
My home page for YouTube had this video on my "Things you might be interested in" feed: "Getting Dressed in 1816". It's centered around Mary Shelley and the night she was inspired to write Frankenstein, but after the first few seconds, it inexplicably goes to the part about getting dressed. It only lasts about halfway through the video, but it kind of encapsulates my simplest goal--to have a complete outfit.
Time is quickly passing, so I'm starting to worry about my Spencer, hat and reticule. We'll see how things go!!
But I wanted to share the video...
My home page for YouTube had this video on my "Things you might be interested in" feed: "Getting Dressed in 1816". It's centered around Mary Shelley and the night she was inspired to write Frankenstein, but after the first few seconds, it inexplicably goes to the part about getting dressed. It only lasts about halfway through the video, but it kind of encapsulates my simplest goal--to have a complete outfit.
Time is quickly passing, so I'm starting to worry about my Spencer, hat and reticule. We'll see how things go!!
Tuesday, January 8, 2019
Making Progress...kinda
Since my last post, I've made progress on my various sub-projects. These are all parts of the main goal, but they do take time.
On New Year's Day, my husband, Rob, and I made a duct-tape body double of my torso to put over my new dress form. We did this for two reasons: the dress form was a bit smaller than me, and my body has rounded parts that are not necessarily standard on dress forms.
This was fun to do, partly because I like working on projects with Rob (he frequently thinks of things I don't, and he has often helped me with my creative ideas), and partly because I've wanted to do this for years. It took longer than the tutorials I watched, probably because I'm larger than the people in the tutes, and we'd never done this before, so we needed to problem solve as we progressed. But Rob and I are both kind of perfectionists, so we both wanted to do it right.
I'm not a fan of silver duct tape...I find it kind of hard on my eyes, as it is reflective. So after grabbing a ginormous roll of silver, I opted to get a roll of extra strong white tape. We decided to use this for the second layer. The first layer was rather soft, not what I was expecting. But that also explained why so many of the people I watched had really squishy results. The best video (linked here) recommended three layers, but we decided two was plenty. We were almost out of tape after the second layer, and as I was fairly immobile, wrapped in layers of webbing and polymer, I was not really able to travel. It was a bit like armor, and kind of cool in that respect. But I couldn't bend, slouch, or sit, and 2 1/2 hours of standing in uncomfortable shoes had taken its toll, and Rob had developed two blisters from all the tape cutting. We managed to gum up three pairs of scissors, too! I de-gummed them today with acetone.
When Rob cut the form up the center back, it was such a relief! I had to go to the bathroom, my back and feet hurt, and it was almost time for me to start making dinner. We hung the taped shell of my body on the dress form, just to see how it looked. It was a humbling experience. I hate my belly enough as it is, but seeing what I look like in 3D, well... let's just say I have inspiration for more weight loss. I'm currently at the lowest weight I've been in about 20 years, but there's certainly more to lose!


I've been busy with returning to work last week, but I've been working on other parts of the project. I'm tired when I get home, so I don't often have the motivation to do projects that involve several hours on weeknights. So, I crocheted one of the mitts I posted last week, and as you saw on Friday, I worked on the bracelet in class. I did more on it Friday evening...it's now about 2/3 finished.
In order to work on this project in my very small sewing space, I had to clear a lot of accumulated clutter. That actually was really good for me, and I'm donating some of what I unearthed to Ms. Sinclair's supplies. ☺️ And now I actually have room to work in there. That was Saturday.
Today, I padded and stuffed my dress form, and taped up the back to make it permanent. It's very cool to be able to try things on the form. I checked the measurements, and it's pretty much exact. When I was done with that, I got to break out my patterns, cut out the parts I needed, and figure out the measurements for the corset. This was surprisingly challenging! You have to use very specific measurements to determine size, and then what size to cut the gusset panels. It was more complicated than I expected it to be!


So... now I have a fully functional dress form, accurate pattern pieces ready to put to the test, and a clean sewing space. Woohoo! (ignore the crap on the floor under my computer desk...empty bag of stuffing, recycling, papers to file... and the top of my desk has accumulated clutter...I was kinda just tossing stuff on there while cleaning the rest of the area!)
Here is my progress on the bracelet:
This week, I will work on my other mitt (I brought the first one to class on Friday), cut out the chemise and corset test fabric, sew them up, and hopefully finish the bracelet.
I met a friend for lunch on Saturday, and afterwards we went to Shipwreck beads. I picked up some coral beads in two sizes. Coral was a popular material for jewelry, and people from the late 1700s through the mid- 1800s believed coral had health benefits. So if I have time, I might knot myself a necklace (beads strung on silk cord with knots between each bead).
On New Year's Day, my husband, Rob, and I made a duct-tape body double of my torso to put over my new dress form. We did this for two reasons: the dress form was a bit smaller than me, and my body has rounded parts that are not necessarily standard on dress forms.
This was fun to do, partly because I like working on projects with Rob (he frequently thinks of things I don't, and he has often helped me with my creative ideas), and partly because I've wanted to do this for years. It took longer than the tutorials I watched, probably because I'm larger than the people in the tutes, and we'd never done this before, so we needed to problem solve as we progressed. But Rob and I are both kind of perfectionists, so we both wanted to do it right.
I'm not a fan of silver duct tape...I find it kind of hard on my eyes, as it is reflective. So after grabbing a ginormous roll of silver, I opted to get a roll of extra strong white tape. We decided to use this for the second layer. The first layer was rather soft, not what I was expecting. But that also explained why so many of the people I watched had really squishy results. The best video (linked here) recommended three layers, but we decided two was plenty. We were almost out of tape after the second layer, and as I was fairly immobile, wrapped in layers of webbing and polymer, I was not really able to travel. It was a bit like armor, and kind of cool in that respect. But I couldn't bend, slouch, or sit, and 2 1/2 hours of standing in uncomfortable shoes had taken its toll, and Rob had developed two blisters from all the tape cutting. We managed to gum up three pairs of scissors, too! I de-gummed them today with acetone.
When Rob cut the form up the center back, it was such a relief! I had to go to the bathroom, my back and feet hurt, and it was almost time for me to start making dinner. We hung the taped shell of my body on the dress form, just to see how it looked. It was a humbling experience. I hate my belly enough as it is, but seeing what I look like in 3D, well... let's just say I have inspiration for more weight loss. I'm currently at the lowest weight I've been in about 20 years, but there's certainly more to lose!


I've been busy with returning to work last week, but I've been working on other parts of the project. I'm tired when I get home, so I don't often have the motivation to do projects that involve several hours on weeknights. So, I crocheted one of the mitts I posted last week, and as you saw on Friday, I worked on the bracelet in class. I did more on it Friday evening...it's now about 2/3 finished.
In order to work on this project in my very small sewing space, I had to clear a lot of accumulated clutter. That actually was really good for me, and I'm donating some of what I unearthed to Ms. Sinclair's supplies. ☺️ And now I actually have room to work in there. That was Saturday.
Today, I padded and stuffed my dress form, and taped up the back to make it permanent. It's very cool to be able to try things on the form. I checked the measurements, and it's pretty much exact. When I was done with that, I got to break out my patterns, cut out the parts I needed, and figure out the measurements for the corset. This was surprisingly challenging! You have to use very specific measurements to determine size, and then what size to cut the gusset panels. It was more complicated than I expected it to be!


So... now I have a fully functional dress form, accurate pattern pieces ready to put to the test, and a clean sewing space. Woohoo! (ignore the crap on the floor under my computer desk...empty bag of stuffing, recycling, papers to file... and the top of my desk has accumulated clutter...I was kinda just tossing stuff on there while cleaning the rest of the area!)
Here is my progress on the bracelet:
 |
| What most of you saw me doing in class... |
 |
| Just a bit more to go, and this part will be complete! |
This week, I will work on my other mitt (I brought the first one to class on Friday), cut out the chemise and corset test fabric, sew them up, and hopefully finish the bracelet.
I met a friend for lunch on Saturday, and afterwards we went to Shipwreck beads. I picked up some coral beads in two sizes. Coral was a popular material for jewelry, and people from the late 1700s through the mid- 1800s believed coral had health benefits. So if I have time, I might knot myself a necklace (beads strung on silk cord with knots between each bead).
Monday, December 31, 2018
Oops! I forgot!!
My last post was so long that I forgot to discuss one more detail of my ensemble: Gloves.
Regency women had a lot of gloves. Long, elbow-length gloves for evening, short leather gloves for warmth outdoors, lacy little mitts to keep hands warm but fingers free, etc.
I should wear gloves with my outfit. But... I'm not a glover, even though I know how, and I can work with leather. Being ambitious, I have ordered leather for making gloves, however... I only have a month! So I have also bought a digital pattern to make lacy fingerless mitts. I can work on those while watching TV at night, so it's more likely I will make those than real gloves. But... we'll see!
Here's a picture of the mitt pattern:

Keeping it short and sweet! Back to cleaning my worktable....
Hair and Headwear
I'm a hat junkie. I have an obsession with what people wore in the past, yes, but gorgeous hats are a major part of that obsession. And I've been thinking about what I'm going to do for a topper, so to speak, for this project. So... let me share my thoughts and ideas.
I think I may have mentioned in my last post that I ordered some more fabric today. It's payday, and I had some things in my cart at Farmhouse Fabrics that I wanted to complete so that I can get them soon. Many things to work on!! I ordered some lovely, almost sheer cottons with which to make a kerchief and a cap, as well as silk for my bonnet. I wanted to do an entire bonnet on a buckram frame, wired properly, then fulled and covered with silk. However, time tells me that would be a bit more work than I have time for. So... I'm going to do a straw and fabric bonnet. These were common, and are easy to make. Some examples:
I also have saved pictures from the time period--fashion plates that were published in magazines for women to show them the latest styles.


Some of these illustrations include day caps, which I discussed in my last post. I am more partial to a stovepipe shaped hat (kind of straight-sided, flat topped hat with a bonnet brim), but I may have to do a hat with a straw brim and a poufed fabric crown. Some reproduction hats here:

I am more partial to the one on the right, but I don't like how short the brim is. However, in the 1810s, smaller brims were often used.
I do have another option: The turban. Turbans were not the kind that Sikhs or people in the middle east might wear... they were sort of like a poofy or carefully draped beret. Some even had solid bases with draped fabric tacked down in strategic places. Either way, most turbans were stitched into shape, and were not wound around the head. Some examples:
Sooo… no shroom caps for me! Another factor is my hair. As I said in my previous post, curls were the thing, with some exceptions. I have a board on Pinterest that is all about Regency stuff (interested? Click here), which I've broken into sub-sections for different things, like shoes, original garments, and one for hair. Here are some examples of common hairstyles for the time:


Two examples of short hairstyles.
Not everybody wore curls. This portrait shows a beautiful young woman with her hair in a simple, smooth style, and wearing a chemisette over her dress, which was another way of wearing them. I think she'd fit right in these days, apart from the clothing.

So... I plan to put my hair up in back (somehow), wear curls around my face, wear a cap, and a silk and straw bonnet. I have a finely woven straw hat I bought in Williamsburg many years ago that I think I can sacrifice for the cause (instead of buying one to cut up--the nicer ones are about $20). I've ordered two lovely silks for a bonnet--both were remnants and on sale, so, a steal at less than 10 bucks each! One is a soft rosy taupe, and the other is a gold and rose iridescent weave. Leftover materials go to my doll clothing stash. :)
Now to get working. Sort of.
My work table is completely covered in beads, bottles of beads, bags of beads, beading tools, supplies, a couple of bead mats, a new pair of scissors, a special box for holding small beads (Christmas gift from my Mother-In-Law), and two rolls of duct tape. Oh, and plain Christmas ornaments that I meant to bead as gifts, but ran out of time. Gotta put those back in my closet for next year. When I get that all cleaned up, then I can get started on actually sewing!
I can't believe it's getting dark already (4:23 pm). My husband is making a pecan pie (we didn't have time to do it at Christmas, so now it's a New Year's pie). We are going to have our traditional New Year's Eve dinner: fondue! I forget when we started it... it was in the early years of our marriage, and has now become tradition. I went to Freddy's this morning and got some Emmenthaler swiss, crusty breads (Mediterranean olive and a French baguette), a granny smith apple, and a few other things for meals for the next few days. I think we'll while away the evening hours by playing Harry Potter Trivial Pursuit (family gift from Santa) with Ella, or playing some other game. We also have a Sherlock Holmes puzzle we could do, too. It's just the three of us tonight (my dad and niece went to Montana for my cousin's wedding, which is tomorrow), so we'll do something fun together. I'm not sure if Ella will make it to midnight, but she's planning to try!
Well, see you next year!!
I think I may have mentioned in my last post that I ordered some more fabric today. It's payday, and I had some things in my cart at Farmhouse Fabrics that I wanted to complete so that I can get them soon. Many things to work on!! I ordered some lovely, almost sheer cottons with which to make a kerchief and a cap, as well as silk for my bonnet. I wanted to do an entire bonnet on a buckram frame, wired properly, then fulled and covered with silk. However, time tells me that would be a bit more work than I have time for. So... I'm going to do a straw and fabric bonnet. These were common, and are easy to make. Some examples:
 |
| A gorgeous vintage bonnet. |
 |
| Silk-covered vintage bonnet. I wanted to do something like this (stovepipe hat). |
 |
| Gorgeous brown silk and velvet bonnet from the time period. |
 |
| This is a French bonnet from a museum exhibit. |
 |
| Another beauty, this one in straw with fancy ribbon as the decoration. |
I also have saved pictures from the time period--fashion plates that were published in magazines for women to show them the latest styles.


Some of these illustrations include day caps, which I discussed in my last post. I am more partial to a stovepipe shaped hat (kind of straight-sided, flat topped hat with a bonnet brim), but I may have to do a hat with a straw brim and a poufed fabric crown. Some reproduction hats here:
 |

I am more partial to the one on the right, but I don't like how short the brim is. However, in the 1810s, smaller brims were often used.
I do have another option: The turban. Turbans were not the kind that Sikhs or people in the middle east might wear... they were sort of like a poofy or carefully draped beret. Some even had solid bases with draped fabric tacked down in strategic places. Either way, most turbans were stitched into shape, and were not wound around the head. Some examples:
 |
| This one looks a bit like a scary mushroom... not my style. And so... yellow! Yellow was a popular color for evening wear (this is definitely a silk organza weave, fancy, for evening), as it was considered quite pretty in candlelight. |
 |
I love this one, but it's for evening wear, and made for
the Empress Josephine. I hope that's not real hair...
makes me feel itchy just thinking about it!
|
 |
| Absolutely gorgeous, but my hair won't do that. |
Sooo… no shroom caps for me! Another factor is my hair. As I said in my previous post, curls were the thing, with some exceptions. I have a board on Pinterest that is all about Regency stuff (interested? Click here), which I've broken into sub-sections for different things, like shoes, original garments, and one for hair. Here are some examples of common hairstyles for the time:
 |
| Evening hairstyle |
 |
Short hairstyle, sporting the popular windswept style.
(is it just me, or does her head seem way too big for her body?)
|
 |
| modern example of Regency hairstyle |


Two examples of short hairstyles.
 |
| This lady is rocking a turban. She has also dressed rather exotically. There was a fad for Indian-like "artistic" styles. |

So... I plan to put my hair up in back (somehow), wear curls around my face, wear a cap, and a silk and straw bonnet. I have a finely woven straw hat I bought in Williamsburg many years ago that I think I can sacrifice for the cause (instead of buying one to cut up--the nicer ones are about $20). I've ordered two lovely silks for a bonnet--both were remnants and on sale, so, a steal at less than 10 bucks each! One is a soft rosy taupe, and the other is a gold and rose iridescent weave. Leftover materials go to my doll clothing stash. :)
Now to get working. Sort of.
My work table is completely covered in beads, bottles of beads, bags of beads, beading tools, supplies, a couple of bead mats, a new pair of scissors, a special box for holding small beads (Christmas gift from my Mother-In-Law), and two rolls of duct tape. Oh, and plain Christmas ornaments that I meant to bead as gifts, but ran out of time. Gotta put those back in my closet for next year. When I get that all cleaned up, then I can get started on actually sewing!
I can't believe it's getting dark already (4:23 pm). My husband is making a pecan pie (we didn't have time to do it at Christmas, so now it's a New Year's pie). We are going to have our traditional New Year's Eve dinner: fondue! I forget when we started it... it was in the early years of our marriage, and has now become tradition. I went to Freddy's this morning and got some Emmenthaler swiss, crusty breads (Mediterranean olive and a French baguette), a granny smith apple, and a few other things for meals for the next few days. I think we'll while away the evening hours by playing Harry Potter Trivial Pursuit (family gift from Santa) with Ella, or playing some other game. We also have a Sherlock Holmes puzzle we could do, too. It's just the three of us tonight (my dad and niece went to Montana for my cousin's wedding, which is tomorrow), so we'll do something fun together. I'm not sure if Ella will make it to midnight, but she's planning to try!
Well, see you next year!!
Subscribe to:
Posts (Atom)